Using formula type questions in Moodle

 Using FORMULA-type questions in Moodle

Importance: This feature helps the faculty by reducing the evaluation time and inspires students to learn the concept thoroughly. The faculty can use Moodle to evaluate every step of the student's solution. The students come to know exactly at what step they went wrong, that too, instantly. They can be given multiple attempts to encourage them to rectify their mistakes. This inspires real learning. For example, see the evaluation results of a single student below

This level of evaluation can be done almost instantly and the error tolerance can be adjusted retrospectively and regraded in negligible time.

How it works?  The software gives the same question but with different input values (random numbers) for each student. So, each student has to solve a different problem. The random numbers can be selected to be within the range set by the examiner (faculty). The answer entered by each student will be auto-evaluated by comparing it with the program-generated solution. The figures below show the view of two different students


For student #2


How to create this type of question in moodle? 
Warning: Moodle formula type question involves some simple programming
Moodle is an open source LMS (Learning Management System). You can access it from here.
After using the login button in the top right corner, you can login to the Moodle LMS. If your Moodle coordinator has created courses in which you are enrolled as a Teacher, you can start setting the FORMULA-type question.

The usual procedure is to create a question in the question bank, and then add that question to a quiz or assignment, etc. So, we will go to the question bank to add this question
 

Then we need to create the question as shown below

Then select the FORMULA-type question, and ADD to the question bank as shown below

Give a suitable name to the question, so that you can find the question among the hundreds of questions (that you might be having in your question bank). You can also create categories and add questions within the category, instead of creating the question in the default category. 

Then you need to create the variables that need to change from student to student. These variables and  their name & range are to be defined under variables as shown below. Note that, the range of variable P is from 100 to 200 at an interval of 10. Similarly, the range of variable w varies from 10 to 30 at an interval of 5. 
Now the variables are to be used to calculate the correct solutions. This can be done using Moodle functions and operators as shown below. These calculations are to be written under Global Variables. For more functions and operators refer to this link.


After calculating the correct answers for various stages of the solution, we need to describe the question to the students as shown below. Note that we should enclose the variables in curly braces {}, so that the software replaces that field with random values from that variable range

The intermediate parts of the answer can be described in CLEAR manner along with units and sign (+ or -) as shown below. A tabular format is not always needed. Note that the positions where the solution is to be entered is written as {#1}, {#2}, and so on. At these locations, text box(es) will be displayed for the students to enter their answers.
Then we need to set the marks for each answer, the variable that gives the correct answer and the tolerance for the accuracy of the answer. In the figure below, the marks for Part 1 of the answer is assigned '1'. Usually for Part 1 the placeholder name will be #1. The part's text is left blank, as there is no need (in this case) to describe the part further. Click on the '?' mark to know more about each feature. You can also request the student for two or more numbers in a single part!!. The answer type is selected as a numerical formula. The (global) variable giving the CORRECT answer is M1 for this part of the question. This is given as Answer. The grading criteria is set to Absolute error less than 1. You can also give relative error tolerance. 

In similar manner, other parts of the solution are described. You will have to use 'Blanks for 2 more parts' button at the bottom to add more parts to the solution.
Finally, save changes to go back to the question bank. If you press, 'Save changes and continue editing', you will stay in the edit-question mode, and will not go back to question bank. If you press cancel, all changes will remain UNSAVED. You can also see the PREVIEW of the question. This gives a view of how the question will be displayed to the student. 

The preview of the above question is as follows

You can use the "Fill in correct responses" button below to see the correct responses. You have to check those responses thoroughly. 
Close the preview, save the question and go back to the question bank. Preview of the question can be accessed from the question bank also.  You can also edit the question, duplicate the question, etc 


Hope you find the post helpful. Please leave comments for my inspiration and for improvement of the blog post. 

For more information and advanced settings check the following links


Using PROSEAL for Examination Seat Allotment


DOWNLOAD PROSEAL3 

DOWNLOAD DATA TEMPLATE


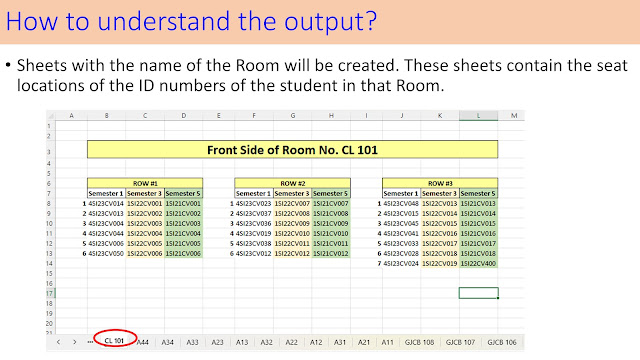
The colours in the first row will be used in the generated sheets. So, you can edit the fill colours of these cells to get the colour of your choice.


Alternatively, you can press Ctrl+Shift+A. ENSURE that the PROSEAL3.xlsm is also open.

If the program starts running, you will see a message box prompting you to arrange the students in random order or in the same order in which the  input data is given. Similarly, you will be asked if the tables are to be exported to word document. To get print in word format without error message, follow the steps under section  "Using PROSEAL to export the output to word" .


Preparation of ERP to be able to feed student attendance


 Before being able to feed student attendance in classes, the following data should enter into the Database

  1. Student (basic) data. ONLY ADMINISTRATOR or ADMISSION section will be able to do this
  2. Creation of student batch  (if required). Usually needed for new students admitted in the current AY. ONLY ADMINISTRATOR or ADMISSION section will be able to do this 
  3. Student programme and batch detail. (Usually this can change in some cases where branch changes can occur). ONLY ADMINISTRATOR or ADMISSION section will be able to do this
  4. Courses offered. This requires the following information ONLY HoD of the department can do thisGo to blog post on this
    1. All active BoS 
    2. The courses in each BoS
    3. The BoS applicable in this session (Academic year and semester- Eg. 2022-23 Odd) and the electives that are offered under each basket in this session
    4. From the above information the courses offered in the current semester will be autogenerated, and this data can be visible to examination controller, and other authorities to whom it is needed
  5. Student section creation for all courses offered in the current semester. ONLY HoD of the department can do thisThe section of the student can change from course to course. For example, in a compuslory theory course, the grouping of students will be different from the grouping of students in a compulsory practical course. ALso, the grouping of students in an elective course will be completely different. Go to blog post on this
  6. Create attendance registers for each Student Section. This is done through Section dashboard by simply clicking on "Create Attendance Registers" button on the left top corner. ONLY HoD of the department can do this.
  7. Assign faculty to each attendance register. ONLY HoD of the department can do this. https://youtu.be/vRAEwTTk4bU 

  8. Faculty can create sessions (Here session means class of a course at a specific time slot and venue) everyday according to their time table, or the faculty can create sessions for all weeks of the semester in one-go .    https://youtu.be/kREfIPABUes         

  9. Then faculty can give attendance to students.

Sending messages through Discuss Module


ERP users can communicate with each other, individually or in groups, through discuss module of ERP


Follow these steps:  Signin> Discuss Module>Direct Messages> search for the faculty and after selecting the desired user, you can start conversation through text messages. See the video below


Attendance Module


In this module, you will be able to take daily attendance, duplicate attendance, print attendance register, analyse the attendance of students course wise, or faculty wise or student wise, etc

Class Attendance

FOr being able to upload class attendance in ERP, the following data is required to be uploaded prior to starting attendance

  • Courses offered: This is done by HoD by assigning a BoS to the semester of a session (BoS-session)
  • Student section: Students sections and lab batches are created by HoD, along with Attendance registers
  • Time Table: Time Table sessions are created and approved
If the above data is in place, every faculty can update attendance of the courses which are assigned to him/her in the time table. Attendance of any class is referred to as Attendance sheet. An attendance sheet can be duplicated to create attendance sheet for a different time slot (session)The following video shows how to give attendance to students


Time Table module


 TIME TABLE MODULE

In this post you will see how to create time table. This can be done by individual faculty members to create sessions for their own courses, or can be done by the department HoD for all faculty members.

        Creating sessions for one course throughout the semester : See the video below

You need the following data to upload a time table

  • The time table usually has the following data in-built

    •  The Programme, semester, section for which the time table is applicable 
    • the working time slots and working Weekdays

    • For each slot and weekday

      • The faculty engaged in that slot on that day
      •  The course taught during that slot and day
      •  The venue for that slot 
  •  The validity of the time table (I.e From date and To Date): Usually these dates can be obtained from Academic Calendar of the semester under consideration 
  • The Lab Batches are defined: If you have not done this, please visit the following post to learn how to assign student batches. Different courses can have different section wise distributions!! For example, theory courses can have only one section, while the Labs and can have different sections/ batches. Some times, a theory course can have tutorial classess which required different sections/ batches for theory courses also. 


  • All courses of the concerned semester are visible under courses offered.  "Dashboards>Curriculum>CoursesOffered"

If this is not done, you have to create BoS-Session, so that all the courses of a particular BoS are visible during generate time table. How to do this?

                         A sample time table is shown below


 The video below demonstrates how to feed the sample time table shown below into ERP


Faculty Module


Faculty Profile and biometric attendance

Faculty members can access  their profile related information by clicking on their name card, as shown in the video below. 

http://15.206.150.114:7073/


The fields that are permanent in nature (like name, date of birth, etc) will be locked for editing in future. SO, please make all the required changes as early as possible. After the data is locked, changes will take long process.